Dual or Triple Monitors and Multiple Taskbars for Windows 7

If you have a dual or a triple monitor setup, and you wish to have a taskbar on the second or second and third monitor. Then you should take a look at Dual Monitor Taskbar.

It’s a free opensource program for Windows 7 that puts a taskbar on your second monitor if you have dual monitor setup or on your second and third monitor if you have a triple monitor setup. I haven’t tried a quad monitor setup or beyond, please let me know if you have in the comments.

Here is a list of configuration options.

  • General
    • Automatically start with Windows
    • Check for Updates
  • Taskbar Appearance
    • Show lables
    • Show clock
    • Mirror mode
    • Use small icons
    • Show notification area
    • Show start button
    • Use custom font
    • Auto-hide the taskbar
  • Taskbar location
    • Mutliple display support
    • Options for Bottom, Left, Right, Top

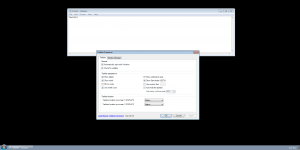
Below is a screenshot of the settings, and notepad on a second monitor. As you can see, it’s hard to tell the different from a normal Windows 7 taskbar.

dual-monitor-taskbar-screenshot

If you have a program running on your second or third screen, it will show on the taskbar for that monitor, so it makes it easy to locate your programs windows.

There is similar software that you can purchase, however Dual Monitor Taskbar seems to get the job done and is free.
Dual Monitor Taskbar Homepage

Apache Error Log mod_fcgid: can’t apply process slot for /usr/local/cpanel/cgi-sys/php5 (cPanel/CloudLinux)

I was getting the following error message in apaches error log on a cPanel machine with CloudLinux

mod_fcgid: can't apply process slot for /usr/local/cpanel/cgi-sys/php5

Looking into the issue, it seemed that a couple of sites were reaching the max EP (Entry PRocess). If you read the ClouldLinux documentation it states the following. http://docs.cloudlinux.com/index.html?limits.html

Entry processes limit control the number of entries into LVE. Each time a process ‘enters’ into LVE, we increment the counter. Each time process exits LVE, we decrement the counter. We don’t count processes that are created inside LVE itself. It is also know as ‘Apache concurrent connections’ limit. The process enter’s into LVE when there is a new HTTP request for CGI/PHP, when new SSH session is created, or when new cron job is started. This limit was created to prevent DoS attacks against web server. One of the fairly popular attacks is to tie up all the Apache connections by hitting some slow page on a server. Once all Apache slots are used up, no one else will be able to connect to the web server, causing it to appear to be down. The issue is worsened by CPU limits, as once site starts to get slow due to CPU limit — it will respond to requests slower and slower, causing more and more connections to be tied up. To solve that, we have created entry processes (often called concurrent connections) limit. It will limit the number of concurrent connections to Apache, causing web server to serve error 508 page (Resource Limit Reached), once there number of concurrent requests for the site goes above the limit.

I

How To Create A WordPress Admin Login Using MySQL

You can do this simply by running the following SQL commands through phpMyadmin or through command line MySQL.

1. First insert the new user account into the database.

If you’re using command line MySQL then you will need to select the database first using the “use” command below:

use wp_mywordpressdatabasename

Now that you’ve selected the database, you can run the following query to insert the new user account into the wp_users table of your WordPress Database. You will want to fill in your details below before executing the query. You enter this query under the “SQL” tab within phpMyAdmin.

INSERT INTO `wp_users` (`id`,`user_login`, `user_pass`, `user_nicename`, `user_email`, `user_url`, `user_registered`, `user_activation_key`, `user_status`, `display_name`) VALUES ('','john', MD5('newpassword123'), 'John Smith', '[email protected]', 'http://geektank.net/', '2013-29-03 00:00:00', '', '0', 'John Smith');


If successfully you should see:

Query OK, 1 row affected (0.00 sec)

Note, the field ‘ID’ is blank because this field is set to auto-increment within the table, a number will automatically to the ‘ID’ field for the new user.

2. Find out what ID your new account received.

Now that you have the successfully inserted the new record into the wp_users table. You want to know the new ID for the new account. You can find this rather easily with phpMyAdmin, but if you’re using the mysql command line simply run the following.

select * from wp_users where user_login = "john";

Which should return:

+----+------------+----------------------------------+---------------+--------------------------+-------------------------+---------------------+---------------------+-------------+--------------+
| ID | user_login | user_pass | user_nicename | user_email | user_url | user_registered | user_activation_key | user_status | display_name |
+----+------------+----------------------------------+---------------+--------------------------+-------------------------+--------+------------+---------------------+-------------+--------------+
| 5 | john | 8359b10e30dfabd587a5661e52249101 | John Smith | [email protected] | http://geektank.net | 2012-08-23 00:00:00 | | 0 | John Smith |
+----+------------+----------------------------------+---------------+--------------------------+----------+--------------+---------------------+---------------------+-------------+--------------+

The ID for the new account we created is 5.

3. Making the new WordPress Account an Administrator (wp_usermeta bits)

Even though we added a new user, it doesn’t have Administrator rights yet. We need to add a couple of entries to the wp_usermeta table. Taking the ID of the new user we create the following two queries.

INSERT INTO `wp_usermeta` (`umeta_id`, `user_id`, `meta_key`, `meta_value`) VALUES (NULL, '5', 'wp_capabilities', 'a:1:{s:13:"administrator";s:1:"1";}');
INSERT INTO `wp_usermeta` (`umeta_id`, `user_id`, `meta_key`, `meta_value`) VALUES (NULL, '5', 'wp_user_level', '10');

These queries will tell provide Administrator rights to our new user account.

4. Enjoy the new account!

You’re done!


Get RackTables working with php-cgi or fastcgi

If you’ve tried to google “racktables authentication not working after install” you won’t find much, but there is a couple of articles about fastcgi and the PHP_AUTH_PW and PHP_AUTH_USER not being passed correctly. But no real solution to the problem.

I was able to get RackTables working using the following work around posted on http://www.rosmir.org/Index/Docs/archive/LabsFolder/FastCGI which has nothing to do with RackTables.

  1. You will need to add the following to your .htaccess file.
    RewriteEngine on
    RewriteRule .* - [E=HTTP_AUTHORIZATION:%{HTTP:Authorization},L]
  2. Next you will need to modify the inc/auth.php file and add the following before the function authenticate.
    if(preg_match('/Basic+(.*)$/i', $_SERVER['REDIRECT_HTTP_AUTHORIZATION'], $matches)) {
    list($_SERVER['PHP_AUTH_USER'], $_SERVER['PHP_AUTH_PW']) = explode(':' , base64_decode(substr($_SERVER['REDIRECT_HTTP_AUTHORIZATION'], 6)));
    }
  3. It should look like following below when completed.
    function authenticate ()
    {
    if(preg_match('/Basic+(.*)$/i', $_SERVER['REDIRECT_HTTP_AUTHORIZATION'], $matches)) {
    list($_SERVER['PHP_AUTH_USER'], $_SERVER['PHP_AUTH_PW']) = explode(':' , base64_decode(substr($_SERVER['REDIRECT_HTTP_AUTHORIZATION'], 6)));
    }
    global
    $remote_username,
    $remote_displayname,
    $auto_tags,
    $user_given_tags,
    $user_auth_src,
    $script_mode,
    $require_local_account;
    if (!isset ($user_auth_src) or !isset ($require_local_account))
    throw new RackTablesError ('secret.php: either user_auth_src or require_local_account are missing', RackTablesError::MISCONFIGURED);
    if (isset ($_REQUEST['logout']))

Upgrading Memory on a Macbook Pro OSX with the GeIL 16GB Memory Kit (GS316GB1333C9DC)

I recently purchased the “GeIL 16GB (2 x 8G) 204-Pin DDR3 SO-DIMM DDR3 1333 (PC3 10660) Laptop Memory (GS316GB1333C9DC)” from NewEgg on boxing day in hopes that it would work in my Macbook Pro (Early 2011 15″ – MC721LL/A – MacBookPro8,2 – A1286 – 2353-1*)

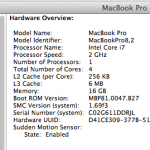
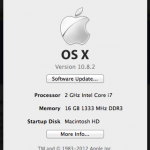
And to my surprise after installing the memory my Macbook Pro booted and actually posted to OSX 10.8.2, here is a screenshot of the “About This Mac” and “System Report” sections showing that 16GB of memory is installed.

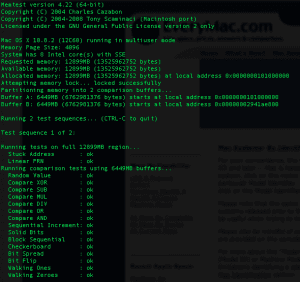
Even thought I could boot into OSX, I still needed to confirm that everything was stable. There is a program called memtest by Command-Tab that will allow you to test the memory extensively. The best way to test is through Single User Mode to ensure that you test all memory and with minimal running in the background. If you run memtest via terminal when OSX is booted, then you will only be able to test available memory. I’ve provided a screenshot of memtest running from OSX via terminal, and you can see that it only detects 12GB of memory. This is because the rest has been used and can’t be tested.


memtest-macbookpro-16gb

Microsoft IIS 7.5 Best Practices

I thought everyone should take a look at this quick Micrsoft IIS 7.5 Best Practices article, it talks a little bit about security but mostly just what not to leave on was default. If you have any other sites or information you want to share, please comment!

http://adminspeak.wordpress.com/tag/iis-7-5-best-practices/

IIS Site Slow to Load on First Visit/Load (SiteFinity)

I had to deploy a new website that was done by a web design company, it was created in Sitefinity. I didn’t have the option to install it, I simply was given the site files and the database. I think had to figure out a way to update the database configuration file, of which Sitefinity doesn’t really have much documentation on. I will post if I find anything related on how to update the Sitefinity database connection strings in the Sitefinity configuration file.

I was able to get Sitefinity working, and the content was displaying properly. However after a little while the site would begin to load slowly, but only on the first page load. I could tell it had something to do with the idle timeout for the application pool in IIS 7.5

Digging further I found the following article that talks about auto start for ASP.NET applications.

http://weblogs.asp.net/scottgu/archive/2009/09/15/auto-start-asp-net-applications-vs-2010-and-net-4-0-series.aspx

I also find this article about Sitefinity and auto start but not much information on how to implement it properly.

http://patrickdunn.me/blog/posts/2012/10/18/auto-start-sitefinity-iis

I then found the following two articles.

http://scottrozman.net/blog/12-07-27/Sitefinity_5_x_Performance.aspx
http://www.techbubbles.com/aspnet/auto-start-web-applications-in-aspnet-40/

The last article from techbubbles.com talks about the preloadEnabled=”true” and preloadProvider=”PrewarmMyCache” of which just cause IIS 7.5 not to start. Because its not valid XML. The error was

The worker process for application pool 'site' encountered an error 'Configuration file is not well-formed XML ' trying to read global module configuration data from file '\\?\C:\inetpub\temp\apppools\site\site.config', line number '3'. Worker process startup aborted.

I later found out this is because preloadEnabled is actually is a property for the “Application Initalization” module.

http://www.iis.net/downloads/microsoft/application-initialization

This property is available by default in IIS 8.0, hence why you might see some documentation talking about it but no the “Application Initalization” module.

So, if you want to be able to use the preloadEnabled property you will need to install the “Application Initalization” module. Just a note on the installation, you will need the x64 binary which is available under “Additional Downloads” at the bottom of the page. You will also be asked to reboot, so if this is a production server, schedule a maintenance.

The following page will go over how to use the Application Initialization Module.

http://blogs.iis.net/wadeh/archive/2012/05/01/application-initialization-part-2.aspx

That’s it!

Changing the Thumbnail on a YouTube Video to a Custom Image

The following code will allow you to use a custom image for the thumbnail on a YouTube video.

<div style="float: right; padding: 20px;"><img style="cursor: pointer;" src="/wp-content/uploads/2012/10/iframeyoutubevideo.png" alt="" /></div>
<div id="thevideo" style="display: none; float: right; padding: 20px;"><object width="460" height="259" classid="clsid:d27cdb6e-ae6d-11cf-96b8-444553540000" codebase="http://download.macromedia.com/pub/shockwave/cabs/flash/swflash.cab#version=6,0,40,0"><param name="allowFullScreen" value="true" /><param name="allowscriptaccess" value="always" /><param name="src" value="http://www.youtube.com/v/tX4l7aPoYLU?version=3&amp;hl=en_US&amp;rel=0&amp;autoplay=1&amp;autohide=1" /><param name="allowfullscreen" value="true" /><embed width="460" height="259" type="application/x-shockwave-flash" src="http://www.youtube.com/v/tX4l7aPoYLU?version=3&amp;hl=en_US&amp;rel=0&amp;autoplay=1&amp;autohide=1" allowfullscreen="allowfullscreen" allowscriptaccess="always" allowfullscreen="allowfullscreen" /></object></div>

Here is an example of what the video would look like.

<div style="float: right; padding: 20px;"><img style="cursor: pointer;" src="/wp-content/uploads/2012/10/iframeyoutubevideo.png" alt="" /></div>
<div id="thevideo" style="display: none; float: right; padding: 20px;"><object width="460" height="259" classid="clsid:d27cdb6e-ae6d-11cf-96b8-444553540000" codebase="http://download.macromedia.com/pub/shockwave/cabs/flash/swflash.cab#version=6,0,40,0"><param name="allowFullScreen" value="true" /><param name="allowscriptaccess" value="always" /><param name="src" value="http://www.youtube.com/v/tX4l7aPoYLU?version=3&amp;hl=en_US&amp;rel=0&amp;autoplay=1&amp;autohide=1" /><param name="allowfullscreen" value="true" /><embed width="460" height="259" type="application/x-shockwave-flash" src="http://www.youtube.com/v/tX4l7aPoYLU?version=3&amp;hl=en_US&amp;rel=0&amp;autoplay=1&amp;autohide=1" allowfullscreen="allowfullscreen" allowscriptaccess="always" allowfullscreen="allowfullscreen" /></object></div>

WordPress SEO plugin by Yoast

I recently installed the plugin Wordpres SEO by Yoast on my this blog, and others. It was recommended by one of those top 10-20-50 WordPress Plugin posts you find all over the place.

You can read more about Yoast and their plugin on their website http://yoast.com/articles/wordpress-seo/

One of the features that comes in handy quite often when writing a new post or page, is the Snippet Preview as seen below:

It hangs out just below the content box when you’re writing up your page or post, and it provides a preview of what your article will look like when its posted on Facebook or other sites that take a preview of your article.