Using Cloudinit and Netplan with IP’s on a different Network and Gateway

If you’ve ever had to utilize a hosting provider that offers the option to buy extra IPs or failover IP addresses, you may have observed instances where these IPs shared the same gateway as your original IPs, rather than being part of the additional IP network.

Here are some of the providers I’m aware of that require this.

  • OVH
  • SoYouStart

The problem is when you use Cloudinit to deploy your VM’s on Ubuntu which uses netplan and unfortunately, there isn’t a method to configure netplan through Cloudinit to use a gateway that isn’t on the same network as the IP address.

I’m using Proxmox, and although you can create a custom network configuration for netplan.yml and deploy it as a snippet via Cloudinit. This isn’t ideal.

Canonical looks to have fixed the bug this year (2023) in January https://github.com/canonical/cloud-init/pull/1931

However, that most likely relates to the new Ubuntu LTS. I’ve tested this within Ubuntu 20.04, and the appropriate config is in place. Here’s the generated /etc/netplan/50-cloud-init.yaml

root@srv01:~# cat /etc/netplan/50-cloud-init.yaml
# This file is generated from information provided by the datasource.  Changes
# to it will not persist across an instance reboot.  To disable cloud-init's
# network configuration capabilities, write a file
# /etc/cloud/cloud.cfg.d/99-disable-network-config.cfg with the following:
# network: {config: disabled}
network:
    version: 2
    ethernets:
        eth0:
            addresses:
            - 147.135.0.0/24
            match:
                macaddress: 02:00:00:79:e4:73
            nameservers:
                addresses:
                - 213.186.33.99
                search:
                - domain.com
            routes:
            -   on-link: true
                to: default
                via: 15.0.0.254
            set-name: eth0
        eth1:
            dhcp4: true
            match:
                macaddress: 8a:ca:d3:4d:c9:28
            set-name: eth1
    Reddit – Dive into anything
    www.reddit.com
    BUG: No routing in VM with cloud init (ubuntu 18.x – 19.4) | Proxmox Support Forum
    It´s possible a bug in the network setting from proxmox to VMs with cloud-init and ubuntu. I have see many forum entries about the same problemas! The big…
    forum.proxmox.com

    https://linuxconfig.org/how-to-add-static-route-with-netplan-on-ubuntu-22-04-jammy-jellyfish-linux

    MySQL 8 Increasing table_open_cache in Ubuntu 20

    So if you’ve ever had to increase table_open_cache in Ubuntu 20, you’ll probably find that it doesn’t work the traditional way. Which is mind blowing! But I have a guess as to why. It’s to stop you from blowing up your server from too many open files!

    I had updated /etc/mysql/mysql.conf.d/mysqld.cnf with the following

    Plain Text

    However, MySQL was only showing the value set at 4945

    Plain Text

    After some Google searching, I found this thread https://askubuntu.com/questions/1241013/cannot-increase-mysql-table-open-cache-in-ubuntu-20-04

    Which pointed me to /lib/systemd/system/mysql.service and the line LimitNOFILE

    Plain Text

    Based on the information in the post, the LimitNOFILE is causing an automatic change to the “table_open_cache” variable. Modifying it to say 20000 will allow you to go with an 8000 table_open_cache. Copy and pasting into WordPress wouldn’t have done this post justice. So I screenshotted it.

    After making the changes and restarting MySQL I got table_open_cache set to 8000

    Setting up MySQL Statistics in Netdata

    MySQL Metrics in Netdata

    You might noticed MySQL statistics aren’t being show in Netdata. Here’s what I ran into.

    Error: “MySQLdb or PyMySQL module is needed to use mysql.chart.py plugin”

    The required python libraries for MySQL are missing, so you simply need to install them. For Ubuntu/Debian the following command should correct it.

    Shell

    Setting up Netdata MySQL User

    You might also see these errors in your log.

    Plain Text

    The fix is simple, add a user called Netdata with a password. Note, you can setup the Netdata user without a password, but this may expose information to the system that you might not want. Full information is located on Netdata’s website.

    https://learn.netdata.cloud/docs/agent/collectors/python.d.plugin/mysql

    So let’s get Netdata pulling MySQL data.

    Fast, open and potentially insecure no password optiom

    This will just work, but leave a user on your MySQL instance without a password.

    Plain Text

    Password based polling

    Let’s run the same command as above but give the user a password.

    Plain Text

    Now we need to tell Netdata the password.

    Plain Text

    Instead of editing the defaults, go to the bottom of the config and just create a new section with the following

    Plain Text

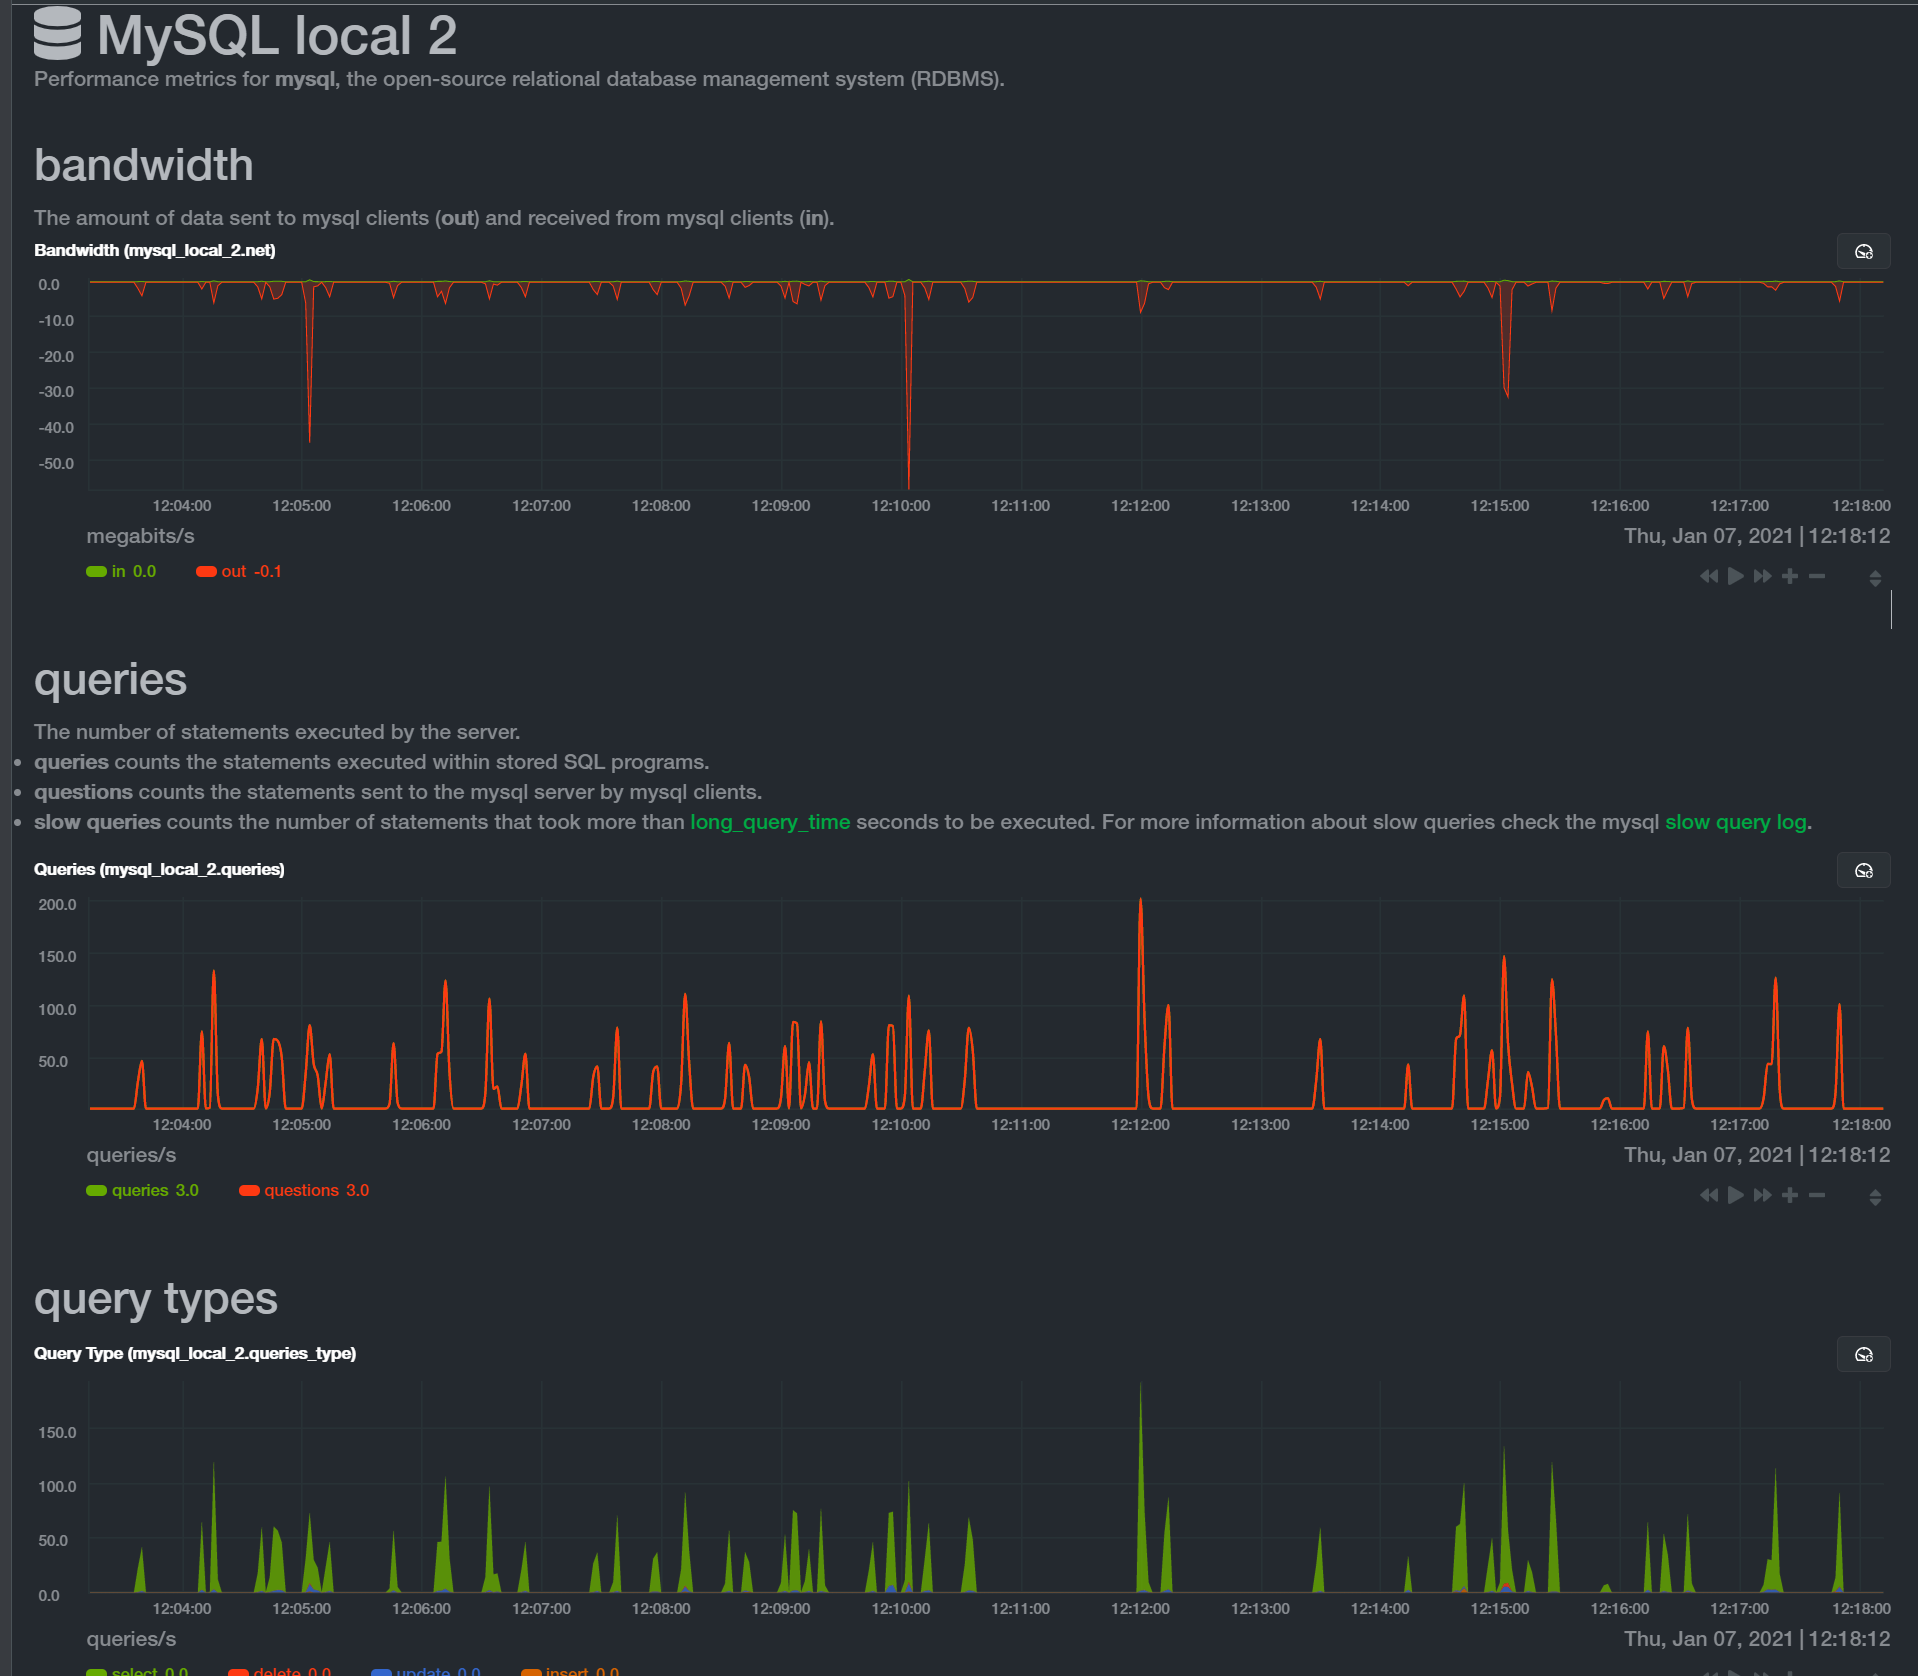
    Now you should see MySQL metrics in Netdata

    View of MySQL Metrics in Netdata

    So You Start netplan Configuration for Additional IP’s

    This took way too long to figure out and it’s my own fault as I do have a good understanding of networking.

    When you order additional IP’s from So You Start, you’re usually giving IP’s in a different range the main IP address of your server. This might confuse some because of how traditional networking states you have to be in the same subnet as your gateway.

    This causes problems for deploying virtual machines when using Xen and Ubuntu 18 as it has moved over to netplan. The problem lies in the fact you shouldn’t be able to reach your gateway out of your subnet.

    So you have to do the following so that netplan is able to understand how to add the gateway properly.

    Go

    Here’s the wonderful thread it came from

    https://askubuntu.com/questions/1062406/ubuntu-18-04-server-vps-on-failover-ip-ovh

    Xen Ubuntu 18 Guest Creation Using xen-create-image (bionic template and netplan fix included)

    So I was having issues with deploying Ubuntu 18 guests on a Xen hypervisor. It originally started with a template for bionic not existing.

    This is easily fixed with a couple of commands to copy the karmic.d template to bionic.d template.

    However, once your host boots up. You’re now faced with a network issue as Ubuntu 18 added netplan as the default network manager.

    This is fixed by replacing the /usr/share/xen-tools/40-setup-networking file with a new xen-tools 4.8 release.

    Here is the github comment.

    Plain Text

    You can simply do the above to fix your issue, or install the latest 4.8 xen-tools at https://github.com/xen-tools/xen-tools/releases

    Or you could just grab the 4.8 ubuntu package from eoan Ubuntu 19.10 at http://mirrors.kernel.org/ubuntu/pool/universe/x/xen-tools/xen-tools_4.8-1_all.deb

    RRDTool Error When Migrating Observium from 32bit to 64bit Server

    We had a 32bit Ubuntu server that was getting pegged due to the lack of memory it was able to use when observium was kicking off it’s cron. So I decided to move Observium to a 64bit Ubuntu server.

    Unfortunately when trying to run the poller, the following error appeared.

    ERROR: This RRD was created on another architecture

    The solution was to go back to the old machine and dump the .rrd files to .xml using the rrdtool dump command. I found the solution on this article.

    https://blog.remibergsma.com/2012/04/30/rrdtool-moving-data-between-32bit-and-64bit-architectures/

    However, since the files were located in folders, the code snippet provided wasn’t going to do much. So I just did it with my good old friend xargs, cause I’m lame like that. So I ran the following on the 32bit Ubuntu server.

    find . | grep "\.rrd" | sed 's/.rrd//g' | xargs --verbose -l -I ext rrdtool dump ext.rrd > ext.xml

    Then I used rsync to copy all the data over to the new 64bit Ubuntu server. And then ran the following.

    find . | grep "\.xml" | sed 's/.xml//g' | xargs --verbose -l -I ext rrdtool restore -f ext.xml ext.rrd

    And Observium was back to normal! Yea!

    Tips and Tricks for Building Ubuntu Packages and Compiling

    If you’re about to build packages

    • apt-get install build-essential

    If you can’t find debbuild

    • apt-get install devscripts

    You receive the following error

    dh: unable to load addon quilt: Can't locate Debian/Debhelper/Sequence/quilt.pm in @INC (you may need to install the Debian::Debhelper::Sequence::quilt module) (@INC contains: /etc/perl /usr/local/lib/perl/5.18.2 /usr/local/share/perl/5.18.2 /usr/lib/perl5 /usr/share/perl5 /usr/lib/perl/5.18 /usr/share/perl/5.18 /usr/local/lib/site_perl .) at (eval 13) line 2.
    BEGIN failed--compilation aborted at (eval 13) line 2.
    • apt-get install quilt

    You receive the following error

    dh: unable to load addon autoreconf: Can't locate Debian/Debhelper/Sequence/autoreconf.pm in @INC (you may need to install the Debian::Debhelper::Sequence::autoreconf module) (@INC contains: /etc/perl /usr/local/lib/perl/5.18.2 /usr/local/share/perl/5.18.2 /usr/lib/perl5 /usr/share/perl5 /usr/lib/perl/5.18 /usr/share/perl/5.18 /usr/local/lib/site_perl .) at (eval 15) line 2.
    BEGIN failed--compilation aborted at (eval 15) line 2.
    • apt-get install dh-autoreconf

    Building Ubuntu Package

    • apt-get install build-essential fakeroot dpkg-dev
    • mkdir build
    • cd build
    • sudo apt-get source foo
    • sudo apt-get build-dep foo
    • debchange
    • debuild -S -sd or debuild -us -uc -i -I

    Creating ISO Partition on Local Disk for XenServer/XenCenter 6.5

    I just started playing with XenServer/XenCenter 6.5 and found a couple of templates required ISO images. Specifically Ubuntu 14.04 LTS Trusty Tahr due to a bug, you can google it. Other Images like Ubuntu 12.04 Precise Pangolin didn’t require an ISO and just needed a URL to install. Funny enough this failed for me, I was going to install 12.04 and then upgrade to 14.04 but that failed.

    Google hasn’t really been all that helpful at first, it took me a while to find a solution. There are a lot of old articles that reference LVM which I believe was used up until XenServer 6.2?

    I installed XenServer 6.5 from the ISO installer, this creates two 4GB GPT partitions and leaves the rest of the space on your installation destination as free. For more details the following blog post has some more information about the installation partitions and how to keep them clean.

    http://xenserver.org/discuss-virtualization/virtualization-blog/entry/xenserver-root-disk-maintenance.html

    So I would need to create an additional GPT partition to store my ISO’s on. I used a 128GB SSD for XenServer, I used gdisk and created a 50GB partition.

    gdisk /dev/sda

    I made sure to leave the type as 0700 and then wrote the changes to disk. If you don’t know how to use gdisk, google can help.

    I then had to reboot to see the new partition, and then formatted it as ext3.

    mkfs.ext3 /dev/sda3

    Remember /dev/sda2 is the random 4GB not mounted partition, so don’t format it!

    I then mounted the partition to /mnt/iso and told XenServer about it.

    mount /dev/sda3 /mnt/iso
    
    xe sr-create name-label ="ISO Repository" type=iso device-config:location=/mnt/iso device-config:legacy_mode=true content-type=iso

    It showed as blank within XenCenter and I don’t know why, I just renamed it. This is actually due to a space after “name-label” as per Sean in the comments. Here is the correct line!

    xe sr-create name-label=”ISO Repository” type=iso device-config:location=/mnt/iso device-config:legacy_mode=true content-type=is

    I also noticed it unmounted the partition, so I had to remount it. I then uploaded my ISO images using WinSCP, I then went to go create my new VM! But my newly uploaded ISO’s didn’t show up. I had to refresh the ISO storage so it could see the newly uploaded files. Just click on the new “ISO” SR and click the “Storage” tab and press “Rescan” which then showed the ISO’s correctly.

    Bammmm. Done, any mistakes or incorrectness, please let me know.

    Apache Tomcat Native library Not Found Error on Ubuntu

    Sometimes you might get the following error message in your logs for your Tomcat instance under Ubuntu.

    The APR based Apache Tomcat Native library which allows optimal performance in production environments was not found


    To fix this issue, simply run the following command to install the appropriate library.

    apt-get install libtcnative-1


    The error should go away!